What Makes This the Best Decorated Focaccia Bread Recipe?
Some recipes feed people. This one stops the room. The first time I pulled a decorated focaccia bread out of my oven, golden and glistening with olive oil, covered in tomato flowers and rosemary sprigs that looked like a spring meadow, my kids gasped — and then nobody wanted to cut into it because it was too pretty. That lasted about forty seconds. Then we tore in, and the crust crackled, the crumb stretched open and airy, and everyone forgot all about how it looked because it tasted even better than it looked.
That is the magic of focaccia garden art. It is equal parts baking project and edible painting, and you do not need any art training to pull it off. If you can press a cherry tomato into soft dough, you can make one of these. The base is a classic Italian focaccia — crisp, olive-oil-rich crust, pillowy interior, salty and fragrant — and the decoration is just thinly sliced vegetables and fresh herbs arranged on the proofed dough before it bakes. Heat does the rest: edges caramelize, colors deepen, and your simple arrangement turns into a baked botanical illustration.
Why does this recipe beat the others? Three reasons. First, the dough formula is nearly foolproof. It uses a high-hydration, no-knead method — you stir, you rest, you stretch, you wait — so beginners get bakery-level texture without a stand mixer or any shaping skill. Second, the timing is built for real life. Most of the "work" is the dough resting in the fridge overnight while you sleep; actual hands-on time is under 30 minutes. Third, the decoration guidance is specific: exact vegetable cuts, exact placement order, and the mistakes that make designs slide off or burn, so your first attempt looks like your tenth.
This is the kind of bake that earns its place in your repeat rotation. It feeds a crowd, it photographs beautifully for a party table, and it tastes like the best bread you have ever had — because great focaccia, warm from the oven with flaky salt on top, genuinely is one of the best things in the bread world.
Why Is Decorated Focaccia Bread So Popular?
Decorated focaccia bread — often called focaccia garden art — exploded in popularity because it sits at the perfect intersection of three things people love: it is genuinely delicious, it is wildly photogenic, and it is surprisingly easy. Social media did the rest. During the home-baking boom, home cooks discovered that pressing herbs and vegetables into focaccia dough created these gorgeous floral landscapes, and photos of the results spread everywhere. Suddenly everyone wanted to try the bread you could paint.
But the trend stuck around for a better reason than looks. Focaccia itself is one of the most forgiving breads on earth. The dough is wet and stretchy, which sounds intimidating but actually means it is nearly impossible to overwork. The long, slow rise builds deep flavor with almost zero effort. And the toppings — a flood of olive oil, flaky sea salt, rosemary — are the same ingredients that make restaurant bread baskets irresistible. When you add the decorations, you are not sacrificing a single bit of that flavor; the vegetables roast right on the surface and become sweet, jammy little bursts.
There is also something deeply satisfying about the process. Kneading stress out of dough is one thing, but arranging a garden scene on soft, pillowy dough is pure creative play. Kids love it. Dinner guests love watching it happen. It turns baking from a chore into an activity, and the payoff — sliding that golden, flower-covered loaf out of the oven — never gets old. Whether you call it decorated focaccia bread or focaccia garden art, this is baking as joy, and that is why it is not going anywhere.
What Ingredients Do You Need for Decorated Focaccia Bread?
You need two sets of ingredients: the dough itself, which is beautifully simple, and the decoration vegetables, which are flexible. Here is the full list.
For the focaccia dough:
- 500 g (about 4 cups) bread flour or all-purpose flour — bread flour gives a chewier crumb, all-purpose works fine
- 10 g (2 teaspoons) fine sea salt
- 7 g (2 1/4 teaspoons) instant dry yeast — one standard packet
- 400 ml (1 2/3 cups) lukewarm water — aim for comfortably warm, not hot
- 60 ml (1/4 cup) extra-virgin olive oil, plus more for the pan and drizzling
- 1 teaspoon honey or sugar — feeds the yeast and deepens browning
For the garden decoration (pick and choose):
- 8–10 cherry tomatoes, halved — these become your flower petals and centers
- 1/2 small red onion, sliced paper-thin into arcs — makes lovely curved stems and petals
- 1/2 yellow or orange bell pepper, cut into thin strips — perfect sunflower petals
- A handful of fresh chives or scallion greens — grass, stems, and leaves
- 4–5 sprigs fresh rosemary — feathery foliage and branches
- A few sprigs fresh thyme — delicate filler greenery
- 6–8 pitted black or Kalamata olives, halved — flower centers and accents
- 1 small zucchini or a few asparagus tips (optional) — sliced thin for leaves
- Flaky sea salt, for finishing
- Extra-virgin olive oil, for drizzling over the decorations
That is the whole list. Nothing exotic, nothing you cannot find at a regular grocery store. The dough ingredients are pantry staples, and the decorations are just whatever colorful vegetables and herbs look fresh at the market. Part of the fun is improvising with what you have.

What Equipment Do You Need?
One of the best things about this recipe is how little gear it demands. You probably own everything already.
- A large mixing bowl — for the dough
- A 9 x 13-inch (23 x 33 cm) metal baking pan, or a 12-inch cast-iron skillet — metal gives the crispiest bottom crust
- Parchment paper (optional but helpful) — for easy lifting
- A clean kitchen towel or plastic wrap — for covering the dough
- A sharp knife or mandoline — for slicing vegetables paper-thin
- A small bowl of olive oil and a pastry brush (or your fingers) — for oiling the dough
That is it. No stand mixer, no proofing basket, no special tools. A rimmed baking sheet works in a pinch if you do not have a 9 x 13 pan, though the loaf will be a little thinner.
How Do You Make Decorated Focaccia Bread Step by Step?
This is a two-day recipe only because the dough rests overnight — and that rest is what builds the incredible flavor. Plan ahead by one day and the process itself is easy.
- Mix the dough (10 minutes, evening before) — In your large bowl, whisk together the flour, salt, and instant yeast. In a separate jug, stir the honey into the lukewarm water until dissolved, then pour it into the flour along with 60 ml olive oil. Stir with a wooden spoon or spatula until no dry flour remains. The dough will look shaggy, sticky, and frankly a mess — that is exactly right. High hydration is the secret to an open, airy crumb.
- Cold ferment overnight (12–18 hours) — Cover the bowl tightly with plastic wrap or a lid and slide it into the refrigerator. Walk away. During this long, cold rest, the yeast works slowly, building complex flavor and developing the gluten network without a single minute of kneading. This is the step that separates good focaccia from unforgettable focaccia, and all it costs you is patience.
- Pan and second rise (2–3 hours, baking day) — Pour 2–3 tablespoons of olive oil into your 9 x 13-inch pan and swirl to coat the bottom and sides generously. Tip the cold dough into the pan — it will be bubbly and jiggly. With oiled fingertips, gently stretch and coax the dough toward the corners. It will resist; let it rest 15 minutes, then stretch again. Cover and leave in a warm spot for 2 to 3 hours, until puffy and nearly doubled, with visible bubbles under the surface.
- Dimple the dough (5 minutes) — Preheat your oven to 220°C (425°F). Drizzle another 2 tablespoons of olive oil over the risen dough. Now dimple: press your oiled fingertips straight down into the dough, almost to the bottom of the pan, all over the surface. Do not poke and drag — press straight down and lift. These dimples are classic focaccia; they catch pools of olive oil and give the crust its signature craggy texture.
- Prepare your decoration vegetables (15 minutes) — While the oven heats, slice everything thin. Halve the cherry tomatoes. Cut the red onion into the thinnest arcs you can manage — they curl into beautiful shapes as they roast. Slice bell peppers into thin petal-like strips. Keep herb sprigs whole but trim them to size. Pat everything very dry with paper towels; surface moisture is the enemy of a crisp crust.
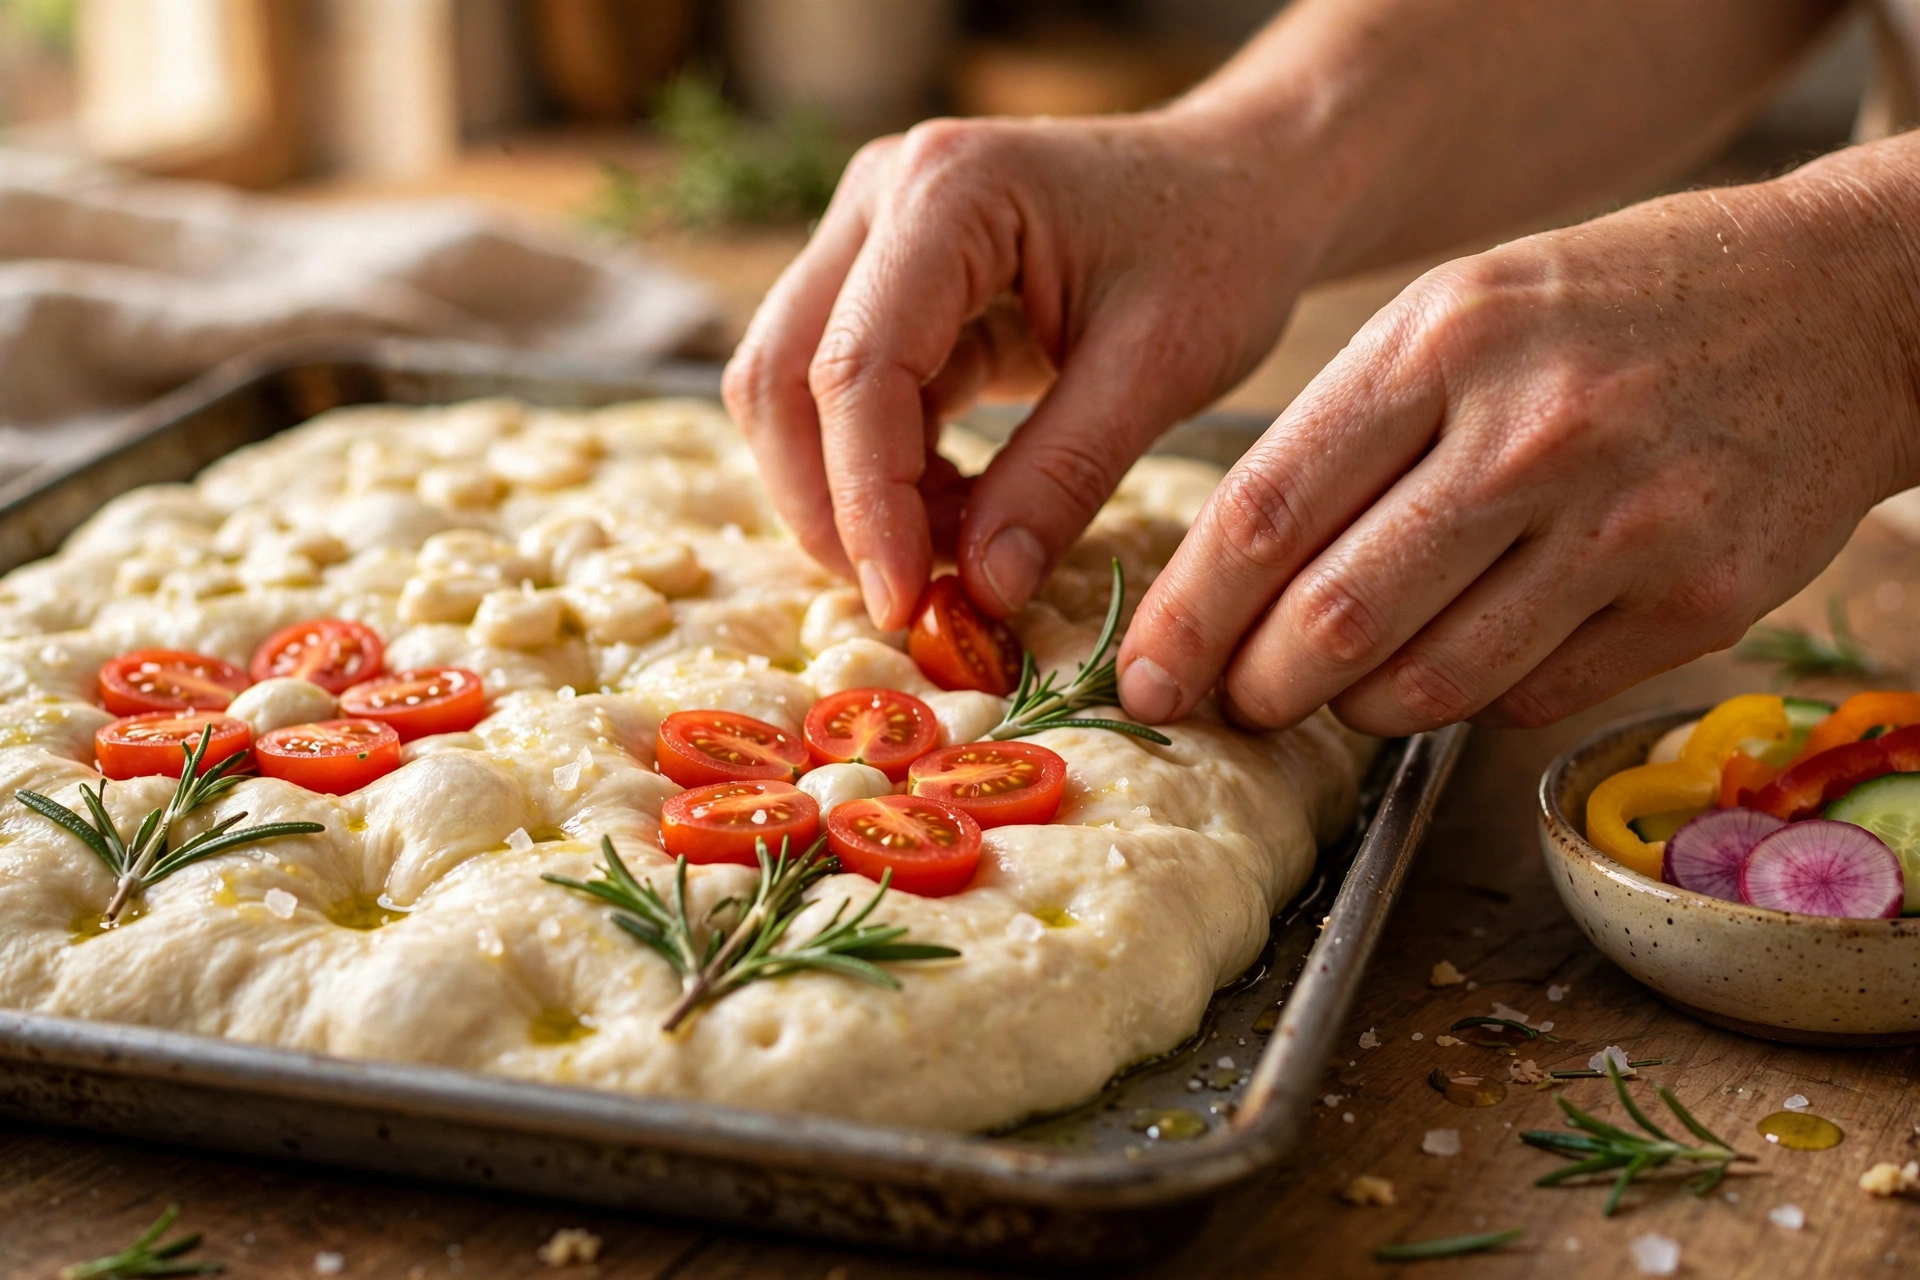
- Paint your garden (15–20 minutes of pure fun) — Here is where the art happens. Think of the dimpled dough as your canvas. Start with the largest elements — place halved cherry tomatoes cut-side up as flower centers, then ring them with petal shapes: thin bell pepper strips, red onion arcs, or more tomato halves arranged in circles. Lay chive stems and rosemary sprigs as stems, branches, and foliage. Tuck thyme sprigs into gaps as filler. Press each piece gently into the dough so about a third of it sits below the surface — this anchors it so it does not slide or curl off in the oven’s heat. Step back, squint, adjust. There is no wrong answer.
- Final oil, salt, and bake (20–25 minutes) — Drizzle the whole decorated surface lightly with olive oil — this protects the vegetables from scorching — and scatter flaky sea salt over everything. Bake on the middle rack for 20 to 25 minutes, until deeply golden brown with crisp, caramelized edges. If any delicate herbs are browning too fast at the 15-minute mark, tent the loaf loosely with foil.
- Cool and serve — Let the focaccia cool in the pan for 10 minutes, then lift it out onto a wire rack for at least another 15. This keeps the bottom crust crisp instead of steaming soft. Slice into squares and serve warm. Listen for the crackle when you cut — that is the sound of success.
What Are the Best Pro Tips for Focaccia Garden Art?
- Slice vegetables paper-thin. Thick slices stay raw-tasting and slide off; thin slices roast quickly, cling to the dough, and caramelize at the edges. A mandoline earns its keep here.
- Pat everything bone dry. Wet vegetables steam instead of roast and leave soggy spots. Paper towels are non-negotiable.
- Press decorations one-third deep. Barely-resting toppings curl, lift, and sometimes fall off. Anchoring them into the dough keeps your garden exactly where you planted it.
- Oil the decorations. A light drizzle of olive oil over the arranged vegetables shields delicate herbs from the oven’s blast and adds flavor.
- Use the cold ferment. Skipping the overnight rest gives you edible bread, but the 12–18 hour cold ferment gives you extraordinary bread — deeper flavor, better browning, airier holes.
- Salt in layers. A little fine salt in the dough plus flaky salt on top creates seasoning depth. Do not skip the finishing salt.
- Bake bold. Pale focaccia is underbaked focaccia. Wait for a deep golden-brown color with dark caramelized edges — that is where the flavor lives.
- Design with odd numbers. Three flowers look better than four; five petals beat six. It is a classic design trick and it works on bread too.
What Are the Most Common Mistakes to Avoid?
1. Decorations sliding off in the oven. This is the number one heartbreak. It happens when toppings sit on top of the dough instead of being pressed in, or when they are cut too thick and heavy. Fix it by pressing every piece about a third of the way into the dimpled dough and keeping slices thin.
2. Soggy vegetables making the crust wet. Juicy tomatoes and peppers release water as they bake. If you skip patting them dry — or pile on too many — you get pale, steamy patches instead of crisp, golden crust. Dry everything, and do not overcrowd.
3. Burning the delicate herbs. Rosemary and thyme can go from fragrant to bitter and black if the oven runs hot or the bake runs long. The olive oil drizzle helps, and tenting with foil at the 15-minute mark saves a design that is browning too fast.
4. Under-proofing the dough. An impatient second rise gives you dense, flat focaccia with a tight crumb. The dough should look puffy, jiggly, and nearly doubled with bubbles visible under the surface. In a cool kitchen this can take the full 3 hours — give it that time.
5. Underbaking out of fear. Pulling the loaf when it is merely golden-blonde leaves the center gummy and the bottom pale. Focaccia wants a bold, deep golden-brown bake. Trust the color, and check that the bottom sounds hollow when tapped.
6. Cutting too soon. Slicing into hot focaccia the second it leaves the oven releases a cloud of steam and collapses the airy crumb you worked for. Ten minutes in the pan plus fifteen on the rack feels long, but it sets the structure and keeps the crust crisp.

What Are 5 Stunning Variations of Decorated Focaccia Bread?
1. Classic Italian Herb Garden
Keep it simple and timeless: rosemary sprigs, thyme, halved cherry tomatoes, and thin red onion arcs on the standard dough, finished with flaky salt and a generous olive oil flood. This is the version that tastes most like the focaccia from a great Italian bakery — the decorations roast into sweet, savory perfection and nothing distracts from that crackling crust.
2. Sunflower Field Focaccia
Design one big sunflower (or a row of them) using thin yellow bell pepper strips as petals radiating from a center of halved black olives or capers. Add chive stems and a few rosemary leaves. It is the most cheerful design in this list and a guaranteed crowd-pleaser at summer gatherings — kids especially love "eating the sunflower."
3. Mediterranean Landscape
Lean savory: Kalamata olive halves, sun-dried tomato strips, thin zucchini ribbons twisted into leaves, red onion arcs, and oregano sprigs, with a sprinkle of crumbled feta added in the last 5 minutes of baking. The flavors go full Mediterranean and the deep reds and purples bake into a dramatic, rustic scene.
4. Spring Meadow with Asparagus and Peas
For spring, blanch thin asparagus tips and use them as stems and grass, dot the scene with halved sugar snap peas or edamame as buds, and add chive blossoms if you can find them. A little lemon zest scattered over the top after baking brightens everything. Light, green, and gorgeous.
5. Holiday Wreath Focaccia
Shape the design as a wreath: a ring of rosemary sprigs forming the circle, cherry tomato halves as holly berries, and thin red onion or red bell pepper strips as a bow at the bottom. Bake it in a round pan for the full wreath effect. It is a showstopping holiday centerpiece that doubles as the dinner bread — festive, delicious, and gone in minutes.

How Do You Store and Reheat Decorated Focaccia Bread?
Focaccia is at its absolute best the day it is baked, ideally still a little warm. But leftovers keep well if you handle them right.
Room temperature: Store cooled focaccia in an airtight container or wrapped tightly in foil at room temperature for up to 2 days. The decorations will soften slightly but the flavor holds. Do not refrigerate fresh focaccia — the cold turns the crumb stale faster.
Freezer: Focaccia freezes beautifully for up to 3 months. Slice it first, wrap individual portions tightly in plastic wrap, then slide them into a freezer bag with the air pressed out. The vegetable decorations freeze fine; delicate herbs may darken slightly but still taste great.
Reheating: The oven is the only way worth doing. Warm slices at 175°C (350°F) for 8–10 minutes (12–15 from frozen) until the crust crisps back up. A quick spritz of water or a light brush of olive oil before reheating revives the crust. Avoid the microwave — it turns that glorious crisp crust chewy and sad.
What Should You Serve with Decorated Focaccia Bread?
This bread is a centerpiece, so let it shine and keep the accompaniments simple. A small dish of good olive oil with balsamic vinegar for dipping is classic and never fails. It is phenomenal alongside soups — tomato soup, minestrone, or a creamy roasted red pepper soup — where it doubles as the dunking bread. Serve it with a big Italian salad and some cured meats and cheeses for an effortless lunch or light dinner. At parties, cut it into small squares and set it out as part of an antipasto spread; it disappears faster than anything else on the table. And honestly? A warm slice with nothing on it, eaten standing in the kitchen, is one of life’s great pleasures.

Frequently Asked Questions
Do the vegetable decorations stay on the focaccia while it bakes?
Yes, if you press them about a third of the way into the dimpled dough before baking. Thin slices anchor best. Thick, heavy pieces sitting on the surface are the ones that slide or curl off, so keep everything thin and well-seated.
Can I make decorated focaccia bread without an overnight rest?
You can, but the flavor will not be as deep. For a same-day version, let the dough rise at room temperature for 2–3 hours until doubled, then proceed. The overnight cold ferment builds noticeably better flavor and browning, so plan ahead when you can.
What vegetables work best for focaccia art?
Cherry tomatoes, bell peppers, red onions, zucchini, olives, asparagus, and scallions are the all-stars — they hold their shape, roast beautifully, and offer strong color contrast. Avoid very watery vegetables like cucumber, and skip anything that browns unpleasantly, like raw apple slices.
Will the herbs burn in the oven?
Delicate herbs can scorch if exposed to intense heat for too long. Drizzling olive oil over your design before baking protects them significantly. If you notice excessive browning at the 15-minute mark, tent the loaf loosely with foil for the remaining bake time.
Can I use all-purpose flour instead of bread flour?
Absolutely. Bread flour gives a slightly chewier, more open crumb, but all-purpose flour produces a delicious focaccia — a touch softer and more tender. Use whichever you have.
How do I get those big airy holes in the crumb?
Three things: high hydration (do not add extra flour to this sticky dough), a full second rise until the dough is puffy and jiggly, and a hot oven. Gentle handling matters too — never punch focaccia dough down the way you would a sandwich loaf.
Can I decorate focaccia with cheese?
Yes — add cheese in the last 5–8 minutes of baking so it melts without burning. Crumbled feta, small mozzarella pearls, and shaved parmesan all work. Add it late and it becomes part of the design instead of a scorched mess.
Is decorated focaccia bread suitable for beginners?
It is one of the best beginner bread projects that exists. The no-knead dough is forgiving, the decoration requires zero artistic skill, and even a "messy" garden looks charming once baked. If you can stir and wait, you can make this.
How far ahead can I prepare the decorations?
Slice vegetables up to a day ahead and store them between damp paper towels in a sealed container in the fridge. Pat them dry again before arranging. Assemble the design on the dough right before baking — do not decorate hours early or the vegetables will weep moisture into the dough.
Final Thoughts
Decorated focaccia bread is proof that the prettiest food can also be the most delicious. This recipe gives you a dough that practically makes itself overnight and a canvas for whatever garden scene you dream up — no art degree, no stand mixer, no stress required. Bake it for a party and watch people hover around it. Bake it on a quiet weekend and eat half the pan warm. Either way, you will understand why focaccia garden art became a phenomenon: it is fun to make, stunning to look at, and genuinely one of the best breads you will ever pull from your oven. Now go plant your garden.
For the sweet side of your party spread, check out our mini dessert ideas — 25 bite-size treats that pair perfectly with this bread. Serving a crowd? Pair it with mini tres leches cakes for a dessert everyone remembers.