Eyeball Cookies Recipe
SEO Title: Easy Eyeball Cookies: Spooky Halloween Sugar Cookie Recipe
What Makes These Eyeball Cookies the Best Halloween Treat?
Every Halloween party has the same dessert table. Brownies, cupcakes, a bowl of candy. Fine, but forgettable. Then someone walks in with a tray of eyeball cookies — pale sugar cookies with glossy candy eyeballs staring up, red veins spidering out from the edges — and the whole table changes. People gasp. They laugh. They absolutely must take a photo before they dare to eat one. That is the power of a cookie that looks back at you.
I made eyeball cookies for the first time at a neighborhood Halloween party years ago, and I still remember the reaction. A little kid picked one up, held it at eye level, and whispered, "It's looking at me." Then he ate it in two bites and grabbed another. That is exactly the response you want: creepy enough to be fun, cute enough that nobody is actually scared, and delicious enough that the tray empties fast.
The real secret of eyeball cookies is how easy they are. People assume they require piping skills or special tools. They do not. You bake simple sugar cookies, spread white icing, press a candy eyeball in the center, and pipe a few red veins with gel icing. A ten-year-old can do it. The cookies look professionally spooky, but the technique is genuinely beginner-level.
They are also endlessly adaptable. Want them bloodshot and terrifying? Add more veins. Want them cute for a kids' party? Use pastel sprinkles and skip the red gel. Want them elegant for an adult costume party? Go monochrome with dark chocolate veins. One base recipe, infinite personalities.
From a practical angle, eyeball cookies are a dream party cookie. The dough chills beautifully, the baked cookies freeze well, and the decorating is the kind of repetitive, relaxing task you can do while watching a scary movie. Make them two days ahead, decorate the night before, and walk into your party looking like a Halloween baking genius.
If you have been searching for a Halloween cookie that stands out from the pumpkin-shaped crowd, this is it. Creepy, cute, simple, and seriously tasty. Let me walk you through every step.
Why Are Eyeball Cookies So Popular at Halloween?
Eyeball cookies hit a sweet spot that few Halloween treats manage: they are spooky without being scary. True horror desserts — bleeding cakes, severed-finger cookies — can genuinely gross people out. Eyeball cookies stay on the fun side of creepy. The cartoonish candy eyeballs read as silly, not sinister. Kids love them. Adults find them hilarious. Nobody pushes the tray away.
They are also incredibly photogenic, which matters more than ever. A tray of eyeball cookies is social-media gold. The staring eyes create a visual pattern that stops thumbs mid-scroll. Party hosts love serving something guests photograph, because every photo is free advertising for how great their party was. If you bring these to a potluck, expect your phone to buzz with picture texts.
Nostalgia plays a part too. Many of us grew up with googly eyes on everything — craft projects, puppets, Halloween decorations. Candy eyeballs tap straight into that. They are playful in a way that feels familiar. You are not asking anyone to eat something weird. You are asking them to eat a sugar cookie with a funny face.
The simplicity factor cannot be overstated. Elaborate Halloween baking — think 3D haunted houses or hand-painted cookies — eats entire weekends. Eyeball cookies deliver maximum visual impact for minimum effort. Busy parents, last-minute party guests, and beginner bakers can all pull them off. In a season already packed with costume prep and decoration, a low-effort showstopper is exactly what people need.
Finally, they are interactive in a way most cookies are not. Guests play with them. They arrange the eyes to look at each other. They make the cookies "watch" people across the table. Kids stage little dramas. That playfulness turns a simple cookie into a party activity, and it is a big reason eyeball cookies keep trending every single October.
What Ingredients Do You Need for Eyeball Cookies?
This recipe makes about 24 cookies. The ingredient list splits into the cookie dough, the icing, and the decorations.
For the Sugar Cookie Dough:
- 2 3/4 cups all-purpose flour, plus extra for rolling
- 1 teaspoon baking powder
- 1/2 teaspoon fine salt
- 1 cup (2 sticks) unsalted butter, softened to room temperature
- 1 1/2 cups granulated sugar
- 1 large egg, at room temperature
- 2 teaspoons pure vanilla extract
- 1/2 teaspoon almond extract (optional, but adds wonderful flavor)
For the White Icing:
- 2 cups powdered sugar, sifted
- 3 to 4 tablespoons milk (or water for a firmer set)
- 1 tablespoon light corn syrup (gives the icing a pretty sheen)
- 1/2 teaspoon vanilla extract
- Pinch of salt
For Decorating:
- 24 large candy eyeballs (about 3/4-inch size; Wilton and store brands both work)
- 1 tube red decorating gel or red gel food coloring with a fine tip
- Optional: black gel icing for pupils on smaller eyeballs
A few notes before you shop. Buy more candy eyeballs than you need — at least 30 for a 24-cookie batch. Some will have smudged pupils or arrive cracked, and you want to pick the best-looking ones. For the red veins, decorating gel in a tube is far easier than mixing your own from food coloring. The tube gives you a fine, controllable line with zero mess. If you can only find small eyeballs, that is fine too — just use two or three per cookie for a spider-eye effect.

What Equipment Do You Need?
Nothing exotic here. Standard cookie-baking gear plus a couple of decorating basics.
- Large mixing bowl and electric mixer — hand mixer works fine; stand mixer is easier
- Rolling pin — for rolling the dough evenly
- Round cookie cutters — 2 1/2 to 3-inch circles. A drinking glass works in a pinch
- Baking sheets — two is ideal so you can rotate
- Parchment paper or silicone baking mats — prevents sticking and makes cleanup easy
- Wire cooling rack — cookies must cool completely before icing
- Plastic wrap — for chilling the dough
- Small bowls — for mixing icing
- Spoon or small offset spatula — for spreading icing on cookies
- Fine-tipped squeeze bottle or piping bag with a small round tip — only if you are mixing your own red gel; skip if using a decorating tube
- Toothpicks — surprisingly useful for dragging veins and fixing smudges
How Do You Make Eyeball Cookies Step by Step?
This breaks into three phases: bake the cookies, ice them white, and decorate the eyes. None of it is hard. Take your time with the decorating — that is where the magic happens.
Step 1: Whisk the dry ingredients. In a medium bowl, whisk together the flour, baking powder, and salt. This takes thirty seconds and prevents pockets of baking powder in your cookies. Set the bowl aside.
Step 2: Cream the butter and sugar. In your large mixing bowl, beat the softened butter and granulated sugar with the electric mixer on medium-high for 2 to 3 minutes. You want it pale, fluffy, and noticeably increased in volume. This step builds the cookie's tender texture, so do not rush it. Scrape down the sides of the bowl halfway through.
Step 3: Add the egg and extracts. Beat in the egg until fully combined, then add the vanilla and almond extracts. Mix just until everything comes together. The dough will look smooth and creamy.
Step 4: Combine wet and dry. Add the flour mixture to the butter mixture in two additions, mixing on low speed after each. Stop as soon as the last streaks of flour disappear. Overmixing develops gluten and makes tough cookies — you want to mix the minimum amount needed.
Step 5: Chill the dough. Divide the dough in half, flatten each half into a disk, and wrap tightly in plastic wrap. Refrigerate for at least 1 hour, or up to 2 days. Chilling firms up the butter, which keeps your cookies from spreading into blobs in the oven. Round cookies need to stay round — this step is non-negotiable.
Step 6: Roll and cut. Preheat the oven to 350°F and line your baking sheets with parchment. On a lightly floured surface, roll one disk of dough to 1/4-inch thickness. Cut circles with your cookie cutter, dipping it in flour between cuts to prevent sticking. Place the circles 2 inches apart on the baking sheets. Gather the scraps, re-roll once, and cut more. (Re-roll only once — after that the dough gets tough.)
Step 7: Bake. Bake for 10 to 12 minutes, until the edges are just set and the very bottoms are lightly golden. The tops should still look pale — that is correct. Overbaked sugar cookies turn hard and lose their tenderness. Let the cookies cool on the baking sheet for 5 minutes, then transfer to a wire rack to cool completely. Warm cookies melt icing, so be patient.
Step 8: Mix the icing. While the cookies cool, whisk the powdered sugar, 3 tablespoons of milk, corn syrup, vanilla, and salt in a small bowl. You want a thick but spreadable consistency — like soft-serve ice cream. If it is too thick, add milk a teaspoon at a time. Too thin, add more powdered sugar. The corn syrup is what gives the finished icing that smooth, professional sheen.
Step 9: Ice the cookies white. Spoon about a tablespoon of icing onto each cooled cookie and spread it to the edges with the back of the spoon or a small spatula. You want full, even coverage — this white base is the "white of the eye." Work on a few cookies at a time so the icing does not crust over before decorating.
Step 10: Place the eyeballs. While the icing is still wet, gently press one large candy eyeball into the center of each cookie. Press just firmly enough that it sticks — do not push it through the icing. If your eyeballs are small, cluster two or three together for a creepy multi-eye look. Let the icing set for at least 30 minutes before the next step.
Step 11: Pipe the veins. Using the red decorating gel tube, draw thin lines radiating outward from the eyeball toward the cookie's edge. Vary the lengths and angles — real veins are irregular. Add a few short branching lines off the main veins. Less is more here; five to eight veins per cookie looks bloodshot and creepy, while twenty looks messy. Let the cookies dry completely, about 1 to 2 hours, before stacking or serving.

What Pro Tips Make Your Eyeball Cookies Look Amazing?
The difference between good eyeball cookies and great ones comes down to small decorating choices. Here is what I have learned.
Chill the dough twice. Chill after mixing, and then chill the cut circles on the baking sheet for 10 minutes before they go in the oven. Double-chilled cookies hold their round shape perfectly. Since these cookies are supposed to be eyeballs, a perfect circle matters more than usual.
Roll to an even 1/4 inch. Uneven cookies bake unevenly, and thin spots brown too fast. If you struggle with even rolling, use rolling pin guide rings or stack two wooden rulers on either side of the dough as thickness guides. It feels fussy the first time and becomes second nature fast.
Sift the powdered sugar. Lumps in royal-style icing are the enemy of a smooth white base. Sifting takes one minute and guarantees silky icing. If you skip it, you will be picking tiny lumps out of every cookie with a toothpick. Ask me how I know.
Work in small batches when icing. Icing forms a crust as it sits. Ice four or five cookies, place their eyeballs, then move to the next group. If you ice all 24 at once, the last ones will have crusted over and the eyeballs will not stick.
Vary the eyeball placement. Not every eyeball needs to sit dead center. Offset a few slightly. Tilt one. Put two small ones side by side on a couple of cookies like a spider. The variety makes the tray look alive and playful instead of stamped out by a machine.
Use the toothpick trick for veins. After piping a red vein, drag a clean toothpick lightly along it while the gel is wet. This feathers the line into a thinner, more natural-looking vein with a soft edge. It takes two seconds per vein and dramatically improves the realism.
Let layers dry between steps. Eyeball goes on wet icing. Veins go on dry icing. If you pipe veins onto wet icing, the red bleeds into the white and you get pink smears instead of crisp veins. Patience between steps is the whole game.
Photograph them before the party. Arrange the finished cookies on a dark plate or black napkin — the contrast makes the eyes pop. Take your photos in natural light near a window. You will want these pictures, trust me.
Taste-test the candy eyeballs first. Some brands taste like chalky sugar, others like decent white chocolate. If yours taste bad, guests will pick them off. The better-tasting brands are worth the extra dollar when the eyeball is the centerpiece of the cookie.
Make a few extras. Cookies break. Icing smears. A toddler eats three. Bake a few more than you need so you can serve only the best-looking ones and still have plenty. The rejects are the baker's snack — quality control is important work.
What Mistakes Should You Avoid When Making Eyeball Cookies?
These cookies are forgiving, but a few common errors can take them from spooky-cute to sloppy. Here is what to watch for.
- 1. Skipping the dough chill. Warm dough spreads in the oven. Your perfect circles turn into ovals, and ovals do not read as eyeballs. Every minute you skip in chilling shows up in the final shape. One hour minimum, overnight if you can.
- 2. Icing warm cookies. Even slightly warm cookies melt the icing into a translucent glaze that slides off the edges. The cookies must be completely cool — not "cool enough," completely cool. If you are in a hurry, pop the baked cookies in the fridge for 15 minutes before icing.
- 3. Making the icing too thin. Runny icing pools at the edges and leaves the center bare. It also takes forever to dry and smears at the slightest touch. Your icing should hold a soft peak when you lift the spoon. When in doubt, go thicker — you can always thin it, but thickening thin icing means re-sifting more sugar.
- 4. Pressing the eyeballs too hard. A gentle press seats the eyeball in wet icing. A hard push cracks the cookie or squeezes icing out around the edges in an ugly ring. Think "placing" rather than "pushing." If an eyeball will not stick, the icing has crusted — dab a tiny bit of fresh icing underneath as glue.
- 5. Overdoing the veins. Enthusiasm is the enemy here. A few well-placed red veins look bloodshot and creepy. Covering the whole cookie in red gel looks like a crime scene and reads as messy rather than spooky. Step back after five or six veins and ask if it needs more. It probably does not.
- 6. Stacking cookies before they are dry. Icing needs 1 to 2 hours to set fully; gel veins need even longer. Stack too early and you will lift the eyeball clean off the cookie below it, or smear red gel across the white icing. Test one cookie by touching the edge of the icing — if it dents, wait longer. Parchment between layers is cheap insurance once they are dry.

How Can You Customize Eyeball Cookies? 5 Spooky Variations
The classic white-and-red eyeball is iconic, but these five variations let you match any party vibe.
Variation 1: What Do Bloody Vampire Eyeball Cookies Look Like?
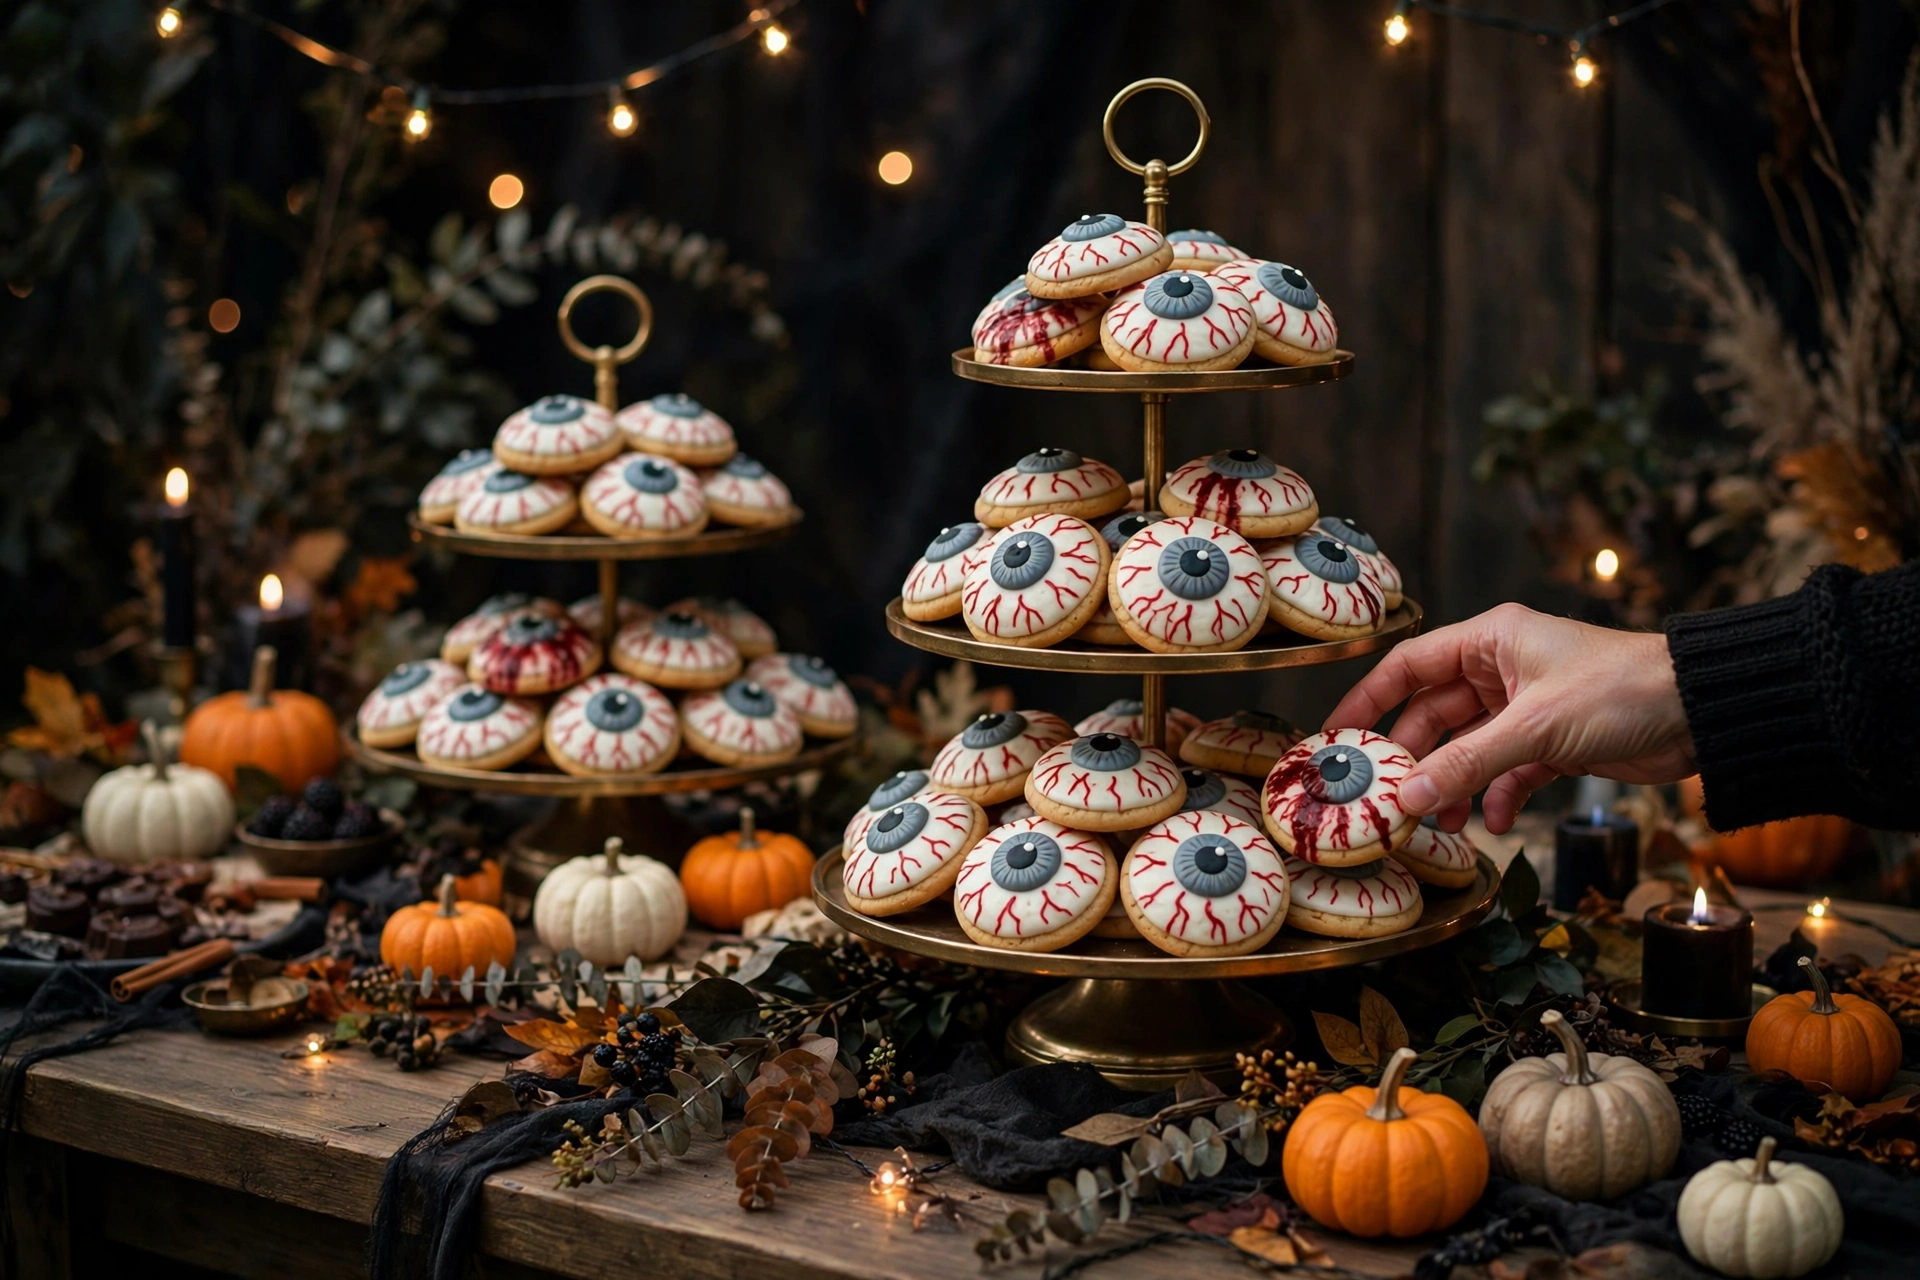
Take the classic and turn up the horror. Use the same sugar cookie base, but tint the white icing the palest pink with one drop of red food coloring. Place the eyeball slightly off-center, then pipe heavier, longer red veins — and add a few "drips" of red gel running from the eyeball down over the cookie's edge like blood. A tiny pool of red gel under one edge of the eyeball sells the effect completely. These are the ones for the adult horror-movie party, the haunted house crowd, the guests who want genuinely creepy. They look startlingly realistic in dim lighting.
Variation 2: Can You Make Monster Eyeball Cookies for Kids?
Skip the red veins entirely — little kids sometimes find them too scary. Instead, ice the cookies in bright colors: green, purple, orange, blue. Use candy eyeballs in assorted sizes, placing two or three on each cookie at playful angles. Add a piped black gel smile under the eyes, or stick on small candy fangs. The result is a friendly monster face rather than a disembodied eyeball. Kids go crazy for these, and parents appreciate a version that will not cause nightmares. Set up a decorating station and let the kids make their own — it doubles as a party activity.
Variation 3: How About Chocolate Eyeball Cookies?
Swap the sugar cookie base for a rich chocolate cookie. Use your favorite chocolate sugar cookie or brownie-cookie recipe, ice with white icing as usual, and decorate identically. The dark cookie edge framing the white icing looks dramatic — like an eye in shadow. For extra richness, use a chocolate ganache instead of powdered-sugar icing; it sets with a beautiful satin finish. Add the red veins and you have got the most decadent eyeball in the room. Chocolate lovers will bypass every other cookie on the tray for these.
Variation 4: What Are Glow-in-the-Dark Eyeball Cookies?
Okay, they do not actually glow — but they look electric. Tint the icing with neon food coloring: electric green, hot pink, neon orange. Use the largest candy eyeballs you can find and surround them with piped neon "lashes" or starburst lines in contrasting colors. Display them under a blacklight at the party and the neon icing fluoresces beautifully. This variation is pure fun for teen parties and glow-themed events. The blacklight display tip is what makes it special — set up a small blacklight over the cookie tray and watch guests lose their minds.
Variation 5: Could You Make No-Bake Eyeball Cookie Truffles?
Yes, and they are dangerously easy. Crumble a batch of baked sugar cookies (or use store-bought), mix with 4 ounces of softened cream cheese until it holds together, and roll into 1-inch balls. Chill until firm, then dip in melted white candy melts. While the coating is wet, press a small candy eyeball onto each truffle and pipe tiny red veins. The result is a bite-size eyeball with a creamy, rich center. They look impressive, require zero rolling or cutting, and the cream cheese filling tastes like cheesecake. Keep them refrigerated and serve chilled — they are the fancy cousin of the classic cookie.

How Do You Store Eyeball Cookies?
Decorated cookies need a little care in storage, but they keep beautifully if you handle them right.
Room temperature: Once the icing and gel are completely dry (give it a full 2 hours, or overnight to be safe), layer the cookies in an airtight container with parchment or wax paper between layers. They keep at room temperature for 4 to 5 days. Keep the container away from heat and sunlight, which can soften the icing and fade the gel colors.
Refrigerator: You can refrigerate decorated eyeball cookies, but it is rarely necessary. The fridge can cause condensation on the icing when you bring them back to room temperature, which may smudge the gel veins. If your kitchen is very warm, refrigerate in an airtight container and let them come to room temperature in the sealed container before opening — this prevents condensation.
Freezer: Undecorated baked cookies freeze perfectly for up to 3 months. Cool completely, layer with parchment in a freezer bag, and squeeze out the air. Thaw at room temperature, then ice and decorate. You can also freeze the raw dough disks for up to 3 months — thaw overnight in the fridge before rolling. I do not recommend freezing fully decorated cookies; the gel veins can bleed as they thaw and the eyeballs may pop off.
Make-ahead plan: Here is the ideal timeline. Bake the cookies up to 3 days ahead and store airtight at room temperature. Decorate them the day before serving so the icing has overnight to set fully. Fully decorated cookies keep 4 to 5 days at room temperature, but they look their best within the first 2 days — the gel veins stay crispest then.
Cookie dough freezing tip: Freeze pre-cut, unbaked cookie circles on a tray, then bag them. You can bake from frozen — just add 1 to 2 minutes to the bake time. This is perfect for getting ahead of a busy Halloween week.
How Should You Serve Eyeball Cookies?
Presentation turns great cookies into an unforgettable display. Here is how to serve them for maximum effect.
Use a dark background. White-iced cookies pop against black. Serve on a black platter, a dark slate board, or a tray lined with a black napkin. The contrast makes the eyes look like they are floating. It is the single easiest upgrade to your presentation.
Arrange the eyes to "look" at guests. Angle the cookies so the pupils face outward, toward whoever approaches the table. It sounds silly, but a tray of cookies all staring at you is irresistibly funny and creepy. Guests will comment on it every time.
Build height. Stack a few cookies on a small cake stand or an overturned bowl to create tiers. A flat tray of cookies looks fine; a tiered display looks like a bakery window. Even one raised level in the center adds drama.
Add spooky props — beside the food, not on it. A few plastic spiders, a small skeleton hand reaching toward the tray, or dry ice in a bowl behind the display (never touching food) creates atmosphere. Keep props from touching the cookies for food safety.
Pair with the right drinks. Cold milk is the classic cookie partner. For a party, add hot chocolate with marshmallows, apple cider, or a "witches' brew" punch. For adults, a coffee bar alongside the cookies keeps the energy up.
Label them with a fun name. A tent card that says "Fresh Eyeballs — Help Yourself!" or "Monster Eyes (sugar cookies)" gets laughs and tells guests what they are eating. Humor is part of the serving experience with these.
Offer take-home bags. Set out small Halloween treat bags and let guests take two or three cookies home. Wrap each cookie in a small cellophane bag tied with ribbon if you want them to survive the trip intact. People love a party favor they can actually eat.
Frequently Asked Questions
Where can I buy candy eyeballs?
You can find candy eyeballs in the cake-decorating aisle of craft stores like Michaels and Joann, at Walmart and Target in the baking section (especially in September and October), and online. Wilton is the most common brand. Buy the large size (about 3/4 inch) for the classic look. Stock up early in the season — they sell out fast as Halloween approaches.
Can I make eyeball cookies without candy eyeballs?
Yes. Pipe a white chocolate or white icing circle for the eye white, let it set, then pipe a smaller colored circle for the iris and a tiny black dot for the pupil. It takes more time but looks great and lets you customize eye colors — green, blue, blood-red irises are all possible. Alternatively, use a white chocolate chip pressed point-down into the icing with a mini chocolate chip as the pupil.
How far in advance can I make eyeball cookies?
Bake the cookies up to 3 days ahead and store them undecorated in an airtight container. Decorate them the day before serving so the icing has overnight to set fully. Fully decorated cookies keep 4 to 5 days at room temperature, but they look their best within the first 2 days — the gel veins stay crispest then.
Why did my cookies spread and lose their round shape?
The dough was too warm when it went into the oven. This is the most common sugar cookie problem. Make sure you chill the dough for at least an hour, and chill the cut shapes on the baking sheet for 10 minutes before baking. Also check that your butter was softened, not melted — melted butter guarantees spreading. And measure your flour correctly: too little flour makes a slack dough that spreads.
Can I use store-bought sugar cookie dough?
Absolutely. Refrigerated sugar cookie dough works fine as a shortcut — slice, bake, and decorate as directed. The flavor will not be quite as good as homemade, but once iced and decorated, nobody will know or care. This is a great option when you are short on time. You can also use store-bought plain sugar cookies and skip straight to decorating.
Are eyeball cookies safe for kids?
Yes, with the usual supervision. The cookies themselves are just sugar cookies. The one caution is the candy eyeballs, which are a choking hazard for toddlers — keep these away from children under three, or make the monster variation with piped icing eyes instead. For older kids, they are perfectly safe and hugely popular.
How do I transport eyeball cookies to a party?
Layer them in a rigid container (not a soft bag) with parchment between layers. Keep the container flat — never tilt a box of decorated cookies. If it is warm out, transport them in an air-conditioned car, not a hot trunk. For long trips, a single layer in a sheet pan covered with plastic wrap (not touching the cookies) works well.
Can I make these gluten-free?
Yes. Swap the all-purpose flour for a 1:1 gluten-free baking flour blend — the kind formulated as a direct replacement. Chill the dough a bit longer, as GF doughs can be softer. Everything else in the recipe stays the same. Check that your candy eyeballs and decorating gel are certified gluten-free if you are serving someone with celiac disease.
My red gel bled into the white icing. What went wrong?
You piped the veins before the white icing was fully dry. The moisture in wet icing wicks the red color outward, creating pink halos. Always let the white base dry completely — at least 1 to 2 hours — before adding gel details. Humidity makes drying slower, so on damp days, give it extra time or point a fan at the cookies.
Can I freeze the decorated cookies?
I do not recommend it. Freezing and thawing causes condensation, which smears gel veins and can loosen the candy eyeballs. Instead, freeze the undecorated baked cookies or the raw dough, and decorate after thawing. You lose nothing in quality and avoid all the risk.
Final Thoughts
Eyeball cookies are proof that the best Halloween treats do not need to be complicated. A tender sugar cookie, smooth white icing, a candy eyeball, and a few red veins — that is the whole recipe. Yet the result stops people in their tracks, starts conversations, and empties the tray faster than anything else on the dessert table.
Do not let the decorating intimidate you. Your first few veins might wobble. Your eyeballs might sit slightly crooked. It does not matter — imperfection makes them look more organic, more alive, more fun. Some of the creepiest-looking cookies I have ever made were the "mistakes."
Bake a batch this Halloween. Watch a kid hold one up to their face and giggle. Watch the adults sneak extras when they think nobody is looking. Then take your photo, because a tray of cookies staring back at the camera never gets old. Happy Halloween, and happy baking.
Planning a Halloween party spread? Start the morning with our spooky Halloween Breakfast, then set these eyeball cookies out next to a warm batch of Spiked Apple Cider for the grown-ups — a frightfully fun combo your guests will remember.